Saturday, 30 November 2013

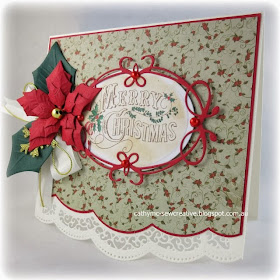
Merry Christmas


Hello everyone! I seem to be on a roll with my Christmas cards of late. Todays card was inspired by a Spellbinders die set that I just received...I couldn't wait to use it! I have been waiting for the Scalloped Border One die which was on back order and it finally came!
I stamped my sentiment using Rich Cocoa onto X-Press It blending paper and I coloured some of the elements using KAISERfusion markers. As they are an alcohol based marker, you need to use a compatible ink and paper to get the best results. To enable the sentiment to blend in with the papers, I used a blending tool and some distress ink to soften the stark white. I am a beginner with alcohol markers and I tried to add some tones in the leaves to add some definition.


Supplies:

Paper: Kaisercraft St Nicholas Paper pad PP913, X-Press It Blending paper, SU! Cherry Cobbler, American Crafts Christmas Glitter Pad.

Stamp: Kaisercraft Turtle Dove C;ear Stamp CS844


Ink: Memeonto Rich Cocoa, Distress Ink Antique Linen

KAISERfusion Markers: G14 Asparagus, G16 Forest, R05 Poppy, P06 Champagne

Other: Spellbinders A2 Scalloped Borders One, Foliage, Layered Poinsettia and Classic Ovals Small, Memory Box Tiffany Frame, Kaisercraft Pearls Red SB795, Gold Ribbon, Hug Snug Seam Binding Chalky White, Gold Bead.

Thanks for stopping by!


post signature

Friday, 29 November 2013

Christmas Card

Hello everyone! I had a little free time so I decided to make a Christmas card. This is a quick a simple card to make. It follows the current Mojo Monday sketch as well as the latest challenge from The Shabby Tea Room. You are asked to create a card or project inspired by the photo and INCLUDE RED, WHITE & BROWN!

I used lots of elements from Kaisercraft's St Nicholas Collection. I just let the papers do all the work. I distressed the edges and did a little fussy cutting and that was it! This is the type of card that is easy to make in bulk if you are pressed for time.

Supplies:

Kaisercraft Products: St Nicholas Collection: Kris Kringle P1285, Father Christmas P1286, Paper Noel P1282, Collectables CT676,  St Nicholas Paper Pad PP913, Kaisercard Weave Coffee Bean CD108

Other: Stampin' Up! Whisper White Cardstock, ribbon, Distress Ink Walnut Stain, Distrezz It All.

Thanks for stopping by!


post signature

Tuesday, 19 November 2013

Cherry Blossom Tutorial


Hello everyone! Today I would like to share a tutorial with you on how to make your own cherry blossom flowers. You can also view this over at the Kaisercraft blog as well.

I love using flowers in my projects. I use all different sizes to add interest and cherry blossoms are great to use to compliment different sized blooms.

You will need :


-          - Kaisercraft Paper Flowers Ivory F602
-           - Stamens
-          - Molding mat and stylus
-          - Ink
-          - Hole punch
-          - Scissors and glue


Select two of the smallest blooms from the pack and ink the edges.

Using a stylus, rotate it around one of the inked flowers so that it creates a cupped shape. 


Punch a hole in the centre of both flowers.
Apply some glue and align both flowers together.
Carefully insert some stamens through the centre. Apply extra glue to secure. Twist the ends of the stamens and you’re done!

Here are some examples of some of my cherry blossoms in a project.....


For the visual learner, enjoy the video tutorial below. This is an easy flower to make and I hope you’ll give it a try!


Thanks for stopping by!


post signature