Wednesday, 28 December 2022

Christmas Cross Stitch


 Hello everyone! I hope that you are well. Today I am sharing a cross stitch gift that I created, using patterns from Stitching With the Housewives. I followed their finishing tutorial to decorate the cross stitch piece and then I placed both pieces in a tray which I purchased from Kmart.


Thanks for stopping by!


Tuesday, 27 December 2022

Christmas Table Runner and Placemats


 Good morning! I hope that you are well. I am back with more Christmas decor. I made a table runner and matching placemats using the June Taylor, Quilt as You Go kits. The hardest part was selecting my fabrics! I wanted to coordinate with the Christmas tree skirt BUT use up fabric from my stash.


The pattern was really easy to follow. Construction was not not difficult once I had all of my pieces cut and labelled and placed onto design boards.


Now that I have finished these, I might even make something like this again but for my own home!

Thanks for stopping by!


Monday, 26 December 2022

Christmas Tree Skirt


Merry Christmas! I hope that your day was joyful with your loved ones. Over the next few days, I will be sharing some projects that I have made as Christmas gifts, now that Christmas has passed. These are Christmas home decor pieces. The first item is a Christmas tree skirt, made from a pattern that I have kept from a quilting magazine from many years ago.


 It features this applique of Christmas bells, poinsettia which I made from felt and some other decorative pieces.


Thanks for stopping by!


Saturday, 24 December 2022

Noel ~Christmas Card


Hello everyone! I hope that you are well. I have finally finished my Christmas cards for the year. I created two cards using the same card design, using dies and papers from my stash...supplies that have been dormant for a while so it brought it me great pleasure in using them once again.


I wanted to use this elegant candle die as my focal image. I framed it with a Spellbinders oval die and some flowers. I made the white poinsettia and used other flowers from my stash. I inked the edges using distress ink to create the vintage look.


Once I had created the blue card, I repeated the same design in pink. Easy!

Supplies:

Paper: Maja Design Vintage Frost Basic |Kaisercraft Forest CD114 and Snow CD 301

Dies: Memory Box Glowing Candles | Hero Arts Christmas Words Fancy Dies | Tim Holtz Holiday Greens | Spellbinders Oval Floral | Magnolia Christmas Poinsettia

Other: Distress ink Vintage Photo | Wild Orchid Crafts Blooms | Sullivans Punch | Kaisercraft Rhinestones SB710 Orange

Have a blessed and safe Christmas


Sunday, 18 December 2022


Hello everyone! I hope that you are keeping well. Today I am sharing another Christmas card and it features Harvey by Tim Holtz. I was so excited when I saw this die as I love the nutcracker and I think this die is perfect! It is part of the Sizzix colorize range so it in theory shouldn't be difficult to construct. 

Once I had everything cut out, I inked the edges using distress ink using a sponge dauber to give it an vintage look. Then I went through my stash and pulled out a series of dies and went from there. I loved My Memory Box tree die so I used it again as the scale was perfect with Harvey and I used an old Kaisercraft presents die.


To finish it off, I die cut an oldie but a goodie Spellbinders oval die and inked it with antique linen distress ink and a blending brush to get that aged look. I made my poinsettia and glued everything into place. 

Supplies:

To make Harvey

Die : Sizzix Tim Holtz Harvey
Kaisercraft Cardstock: CD311 Oatmeal | CD323 Crimson | CD 303 Dove | CD 305 Concrete | CD 302 Slate | CD 325 Ruby | CD 301 Snow | CD 302 Coal | Gold Metallic Cardstock Anko | Distress Ink Vintage Photo

Paper: Maja Design Home for the Holidays | Kaisercraft Letters to Santa Paper pad 

Ink Distress Ink Vintage photo and Antique linen | Versafine Onyx Black Ink

Dies: Spellbinders: Fleur de Elegance | Tim Holtz Holiday Greens | Magnolia Christmas Poinsettias | Kaisercraft Gift Border

Other: Kaisercraft Rhinestones SB710 Orange | Pearls SB714 Champagne | Uniquely Creative Christmas Sentiments stamps

Have a great day!


Friday, 16 December 2022

Christmas Eve


Hello everyone! I hope that you are well. Today I am sharing another Christmas card. It has been ages since I made a purchase of any scrapbook products, and the mailman has bout in my deliveries so it it is time to play. To be honest, I have been in a craft slump as the teacher tired EOY fatigue has well and truly set in and the craft MOJO left the building, so this will be a warm up to craft again.


Supplies:

Paper: Maja Design Home for the Holidays | Kaisercraft Letters to Santa Collectables and 6 1/2 Paper Pad
Cardstock Kaisercraft Blue Haze CD 156 | Coffee Bean CD 108 | Coal CD 302

Dies: Tim Holtz Thinlits Santa's Helper |Memory Box Frosted Christmas Tree
Other: Kaisercraft Pearls Champagne SB 714 | Distress Ink Vintage Photo

Enjoy the weekend!


Friday, 2 December 2022

Joy~Christmas Cards


Hello everyone! I hope you are having a wonderful week. I have made some Christmas cards using a Spellbinders die plus some Kaisercraft supplies. I played around with some embossing folders and a paper collection to create four Christmas cards. One design and four cards! These were fun to make and will be given away very soon.


Supplies:

Kaisercraft Supplies: Card Pack C6 White CD511 | Letters to Santa Paper Pad | Cardstock Forest CD 114 and Ruby CD 325 | Embossing Folders Striped EF 297, Scales EF 297, Holly EF273 and Waffle EF 275| Rhinestones SB2711 and Orange SB710

Spellbinders Joy die S4 1012

Gold Metallic cardstock from my stash


Thanks for stopping by!


Sunday, 27 November 2022

Felt Ornaments


Hello friends! It has certainly been a very long time since I have shared a craft project here on my blog. I have taken a break from scrapbooking, and have been doing other crafty things such as crochet, quilting , cross stitch and a bit of sewing. Being on a design team and constantly sharing projects was very time demanding and so I decided to take a step back and just create when I felt like it!

Here are some felt ornaments that I have made which I plan to give away as gifts very soon. They are quick and easy to make.

Supplies:

Memory Box Plush Gift Ornament die and Memory Box Plush Poinsettia dies, felt from my stash.


Have a great week!


Friday, 21 January 2022

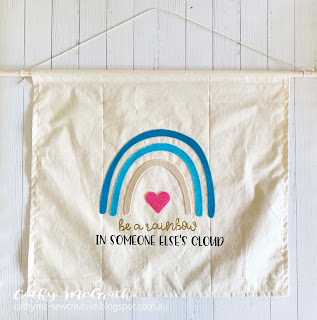
Classroom decor ~ Felt Boho Rainbow Wall Hanging


 Hello everyone! I hope that you are having a great week. I have another classroom decor item to share today. I am adding boho rainbow decor item to the room and I wanted to make some impact. This wall hanging will be near the front entrance of my classroom. I used the same cut file from my previous project and used it to cut felt on my Silhouette cameo 3.


I selected some thin felt and applied Heat n Seal on the back using a hot iron. Once this had cooled I transfered this onto a cutting mat. I used  Cricut fabric grip mat instead of a Silhouette cuttng mat. I also changed my blade to a deep cut blade as well.


My settings to cut the felt are blade 20  speed 3 force 33 passes 2.

This was the first time that I had cut felt using my Silhouette and it worked. I had thick felt (pink) and it didn't work on my Silhoutte, however I have my die cutting dies, so I used my die cutting machine and a Spellbinders heart die and die cut it out.

For the rest, I used heat transfer vinyl and a cricut heat press and adhered everything onto my fabric.

Can't wait to place this in my room!

Have a great day.


Thursday, 20 January 2022

Classroom Decor ~ Boho Rainbow Welcome Sign

Hello everyone! I hope that you are enjoying your day. I have another classroom decor item to share. This item was created using a wooden a-frame from Kmart. Firstly, I applied a coat of spray sealer over the front of the frame and let it air dry. 

I purchased the Boho Rainbow Bundle by Sharp SVG from the Hungry JPEG and selected some permanent vinyl from my stash. I have a Silhouette cameo 3 and it still works like a charm!

I used the font Allspice in Silhouette studio to create my greeting.

This was very easy to create, and the bundle from the Hungry Jpeg is easy to use in Silhouette Studio.


Thanks for stopping by!


Wednesday, 19 January 2022

Classroom Decor ~ Boho Rainbow

Hello everyone. I hope that you are having a good day. I have decided that it is time to redecorate my classroom and I have decided that my new theme will be the Boho Rainbow. I looked at several ideas on pinterest and have been shopping at Kmart and Spotlight to gather supplies.

To alter my rainbow, I applied one layer of gesso and let it air dry. Then I selected some paint and used blue painters tape to tape of each area as I applied each colour with a paintbrush.

Once everything had dried, I used macrame cord to tie my cords to the base of the frame. I used a cord and beads to create a hanger at the top. Everything was purchased from Kmart (the paint I had in my stash).

Supplies:

plywood rainbow

macrame cord

wooden beads

cord

Monte Marte studio acryclic paint set 18 x 36mL paint

liquitex white gesso

Thanks for stopping by!


Tuesday, 18 January 2022

Cross Stitch Pillows


Happy New Year! I hope that you have been safe and well and have enjoyed the holidays with your loved ones. It has been a very long time since I have shared anything crafty with you. Teaching during a pandemic has been the most challenging experience I have been through to this point. Words cannot describe my new 'teacher tired' that I have been experiencing from the end of 2021. 

I have been crafting small projects in the background, and have taken up old crafts that I haven't worked on for a long time. I have been doing some cross stitch and quilting, cut back on scrapbooking and card making temporarily but did make Christmas cards at the very last minute. I just haven't had the time and quite frankly, my mojo left the building.


I have made two cross stitch pillows, following the patterns from Lori Holt's stitch cards.  These projects are very portable and fun to make. I followed Lori's construction on her Youtube channel.


Instead of using felt on the back (which Lori Holt uses), I used some adhesive lace flowers from my stash. I adhered it to my pillow back using hot glue.


Supplies:

Lori Holts stitch card Set A and I, Aida 14 count rustico, called for DMC thread, white adhesive lace trim, fabric from my stash and polyester filling.


Stay safe and well.