Saturday, 30 March 2013

On Your Special Day


Hello everyone! I have a card to share with you for the latest challenge from The Shabby Tea Room.
The theme is Lovely Layers. This week there is a sketch as well as a photo inspiration. You are asked to
create a card or project inspired by the colors in the photo, use the sketch and include lots of layers!


The inspiration from the DT is just amazing! When I saw the challenge, I was very excited and inspired.

My centre image is a stamped flower. I stamped into some SU! watercolour paper and used my SU! markers to colour it in. I used some distress ink to shade the outside of the image to give it a vintage look. I used two of the Opulent Oval dies from Spellbinder to frame it. I also added a doily and two die cut scrolls at each corner to frame it.

I used papers from Maja Designs. I distressed the edges and layered them with a pink cardstock. I also added some lace and seam binding to create the horizontal border, beneath the stamped flower section. To finish my card, I stamped a sentiment and added some flowers.


Supplies:

Paper: Maja Designs Vintage Summer Basic

Ink: StazOn Jet Black, Old Paper distress ink, SU! markers, memento Tuxedo Black

Stamp: JustRite Botannical Medallions and Banners

Other: Spellbinders Opulent Ovals, Memeory Box Elegant Scrollwork, JustRite Vintage Label and banner dies, Hug Snug lyric rose seam binding, Vivaldi rose, Green Tara roses, doily, lace, Zutter Distrezz It All.

Thanks for stopping by!


post signature

Heartfelt Thanks

Hello everyone! I have a card to share with you that follows the latest sketch from Cardabilities.

I have had a bit of a craft spending spree, so my design was influenced by my new goodies!

I started by creating a 6x6" card base. Using a Martha Stewart punch I created a mat. I inked and stitched the edge of my pink striped paper. Using a floral paper I created a banner and a created a border for it that was approx 1/4" larger and inked and stitched again. Then I started to layer. I used some Memory Box flourish dies to back my Spellbinder hearts. I added some flowers and a beautiful Spellbinder butterfly (Les Papillions Two). My horizontal strip consists of 4 layers - Martha Stewart embroidery punch, doily lace punch, lace and then some seam binding.

I added a sentiment as well. I inked the edge to continue the aged look.

Supplies:

Paper: Stampin' Up! Very Vanilla, Kaisercraft ballet, My Minds Eye Lost and Found Market - Market Market paper pad

Stamp: JustRite Stampers Just Because Set

Ink: Versafine vintage sepia, Antique Linen distress ink

Other: Martha Stewart doily lace, embroidery and flourish lace punches, Memory Box Quinn flourish and Elegant scrollwork, Spellbinders fancy framed tags one, Les Papillions Two (butterfly), classic hearts and classic scalloped hearts, Hooked on Craft flowers, Kaisercraft pearls, Hug Snug lyric rose seam binding, lace.


 Be sure to visit the other DT for some inspiration and I hope that you'll join in. Remember to link back to Cardabilities.

May you have a safe and wonderful Easter with your loved ones. Stay safe.

Thanks for stopping by!


post signature

Thursday, 28 March 2013

Spring

Hello everyone. I am sharing a new card with you that is spring inspired. I recently purchased some Maja Design papers and I just absolutely love them! I am also loving my Martha Stewart punch as well, I've used it a lot lately...some people love shoes...me craft products of any kind!

When you are stuck for ideas or you need some new inspiration, the challenges on various blogs are fantastic to help you get going. I also like how you have to think and sometimes try something new. My card today follows the criteria for three challenges which are...

The sketch is from Mojo Monday...
the colours and elements follow The Ribbon Reel...
create a card / project using the PINK, YELLOW & AQUA plus  RIBBON & A FLOWER.

 and the theme is from JustRite Friday Challenge   "Suddenly Spring."

To create my horizontal border, I stamped and embossed using one of JustRite's border stamps. I used the front and back of a patterned paper and added some lace (I replaced the ribbon with lace).

For the banner, I used one of the pink Maja Designs papers and topped it with one of my laser cut border. I trimmed of parts of it so that it could fit nicely onto the banner. Next I added some flowers.....TTR askes for some yellow, so I added a yellow butterfly, flowers and a flourish. The butterfly also really refers to spring to me as well.


Supplies:

Paper: Maja Designs Vintage Summer Basics 1933 and 1922, Stampin' Up! so saffron and whisper white, Kaisercraft duck egg

Stamps: JustRite Let Friendship Bloom and Classic scallop borders one

Ink: Victorian velvet distress ink, Versamark

Other: Art Stamps Australia filigree laser cut border, Spellbinders picot edge circles, standard circles one, classic scallop , Memory Box elegant scrollwork, Cheery Lynn small exotic butterfly, Hooked on Craft flowers, Martha Stewart flourish lace punch, lace, Stampin' Up! white embossing powder.

Thanks for stopping by!


post signature


Sunday, 24 March 2013

Happy Easter

Hello everyone. I am back with another Easter card to share with you. For this card I have followed a sketch from The Sweet Stop and a colour inspiration from Scrapbook Boutique.

This was a quick and simple card to make. Once I worked out what my papers were things came together so easily. I selected papers from Pion Design and coordinated the elements from there. I selected a vintage Easter image and framed it with Spellbinders Timeless rectangle. I inked the edges of my papers and machines around each. To add more pink, I die cut a flourish and added some flowers. I selected a simple sentiment and added it to my card. Again I used foam tape between my layers to add dimension.

Supplies: 

Stamp: Stampin' Up! Teeny Tine Sentiments

Ink: Versafine vintage sepia, walnut stain distress ink

Paper: Pion Design Fairytale of Spring, Stampin' Up! very vanilla

Other: Spellbinders timeless rectangles, Memory Box Quinn flourish, Hooked on Craft flowers, Petaloo Forget Me Nots pink.

Thanks for stopping  by!


post signature

Saturday, 23 March 2013

Easter Blessings

Hello everyone! I am sharing an Easter card that I have created. The Shabby Tea Room has a challenge this week of anything goes and you are asked to create a card or project with any theme that you choose! As Easter approaches, I thought thought I would choose it as a theme and....to try an embrace yellow!

I had this vintage image from my Pion Designs papers. I cut it out and framed it with a Melissa Frances resin frame. I also used two Spellbinders dies to add some interest.

Art Stamps Australia have some gorgeous paper laser cut outs available. I used one of their borders on my card.

Supplies:

Paper: Pion Design For Mother and fairytale of Spring, Stampin' Up! Very Vanilla

Stamp: JustRite Stampers Easter Blessings

Ink: Versafine vintage sepia and antique linen distress ink

Other: Melissa Frances frame, Martha Stewart flourish lace punch, Spellbinders timeless rectangles and twisted metal tags and accents, Prima petal pins iced, Kaisercraft mini paper blooms and pearls, Hooked on Craft flowers, Art Stamps Australia large creme flower border, Becca's peg bow maker.

Thanks for stopping by!


post signature

Wednesday, 20 March 2013

Remember When ~ Easter Layout


Hello everyone! I am sharing a layout that I have created following the latest sketch from Sketchabilities. It features a photo of my brother when he was in kindergarten, which I intend to use in his album that I am working on. As it is approaching Easter, I thought that it is the perfect time to reminisce about that time so many years ago.

I used quite a number of Scrapmatts chipboard pieces. For each I applied a layer of distress stain. Once dry, I repeated this again. I dabbed some gesso on the pieces to create a distressed look. I used an embellishment from the Pion Design collection and typed the event onto my computer and printed it out. It tucks in neatly with my side cluster of flowers etc.


 Here I have simply cut some cardstock and created fishtail banners. Using the one piece of cardstock, I had cut it into two different lengths and used both the front and back.

My side cluster consists of three chipboard flourish pieces. I filled in the gaps with some different sized flowers and die cut butterflies.

Here are some other close ups..


Supplies:

Paper: Pion Design Studio of Memories and For Mother Collections, Kaisercraft coffee bean, DCWV neutral stack

Ink: Walnut Stain distress stain, gesso

Other: Scrapmatts Ornate Frames 10, Flourishes 05 and Assorted Words 16, Dusty Attic Dusty In Bloom smokey blue and leaves, Green Tara flowers, Spellbinders Les Papillions Two, Memory Box Elegant Scrollwork, Martha Stewart flourish lace punch, lace.

Thanks for stopping by!


post signature

Saturday, 16 March 2013

Shabby Chic Dress Form Card

Hello again! The weather is just beautiful at the moment and I certainly hope to get active in my poor garden today to do some weeding and enjoy the fine weather while it lasts. The card  am sharing with you today is a dress form card. The design follows the latest challenge from The Shabby Tea Room. 
You are asked to create a card or project inspired by the photo using PINK, RIBBON/LACE/TULLE and a FLOWER!

I have been drawn to creating cards that feature dresses and dress forms lately.....excited by this challenge!
In the past, I have used a paper template to create my dress forms, but I recently purchased the die from Tim Holtz which is what I used here. I used a brown cardstock and ran it through my Big Kick. I inked the edges to give it an aged look. I ran it through the Big Kick again, this time with some patterned paper. I trimmed the top and bottom, inked it up and attached to the brown form using foam tape. To create the skirt I cut some seam binding, a little bit wider than the waist of the dress form. I cut strips of tulle and cheese cloth approx 1cm x 8cm and attached it to the seam binding with fabric glue. Once I had enough layers, I attached to seam binding to the dress form. I attached the daisy trim and added adhesive pearls to the centres. I cut a strip of ribbon to add a bow but then experimented with it and decided to add it to the skirt as another layer.

Some flowers and a sentiment complete my card. Here are some more close ups...

Supplies:

Paper: Stampin' Up! Very vanilla, Pion Design From My Heart II

Ink: Versafine vintage sepia, walnut stain and antique linen distress ink

Stamp: Fiskars Cameo Ovations

Other: Tim Holtz Sewing Room Bigz die, Fiskars scallop punch, Kaisercraft pearls, Hooked on Craft flowers, Dusty Attic In Bloom leaves, Distrezz it All, doily, daisy trip, pink ribbon, tulle, cheese cloth.

Thanks for stopping by!


post signature

Friday, 15 March 2013

Cardabilities Sketch #71

Hello everyone! I am sharing with you my first DT reveal with Cardabilities. Karan has created a wonderful sketch which is as follows:

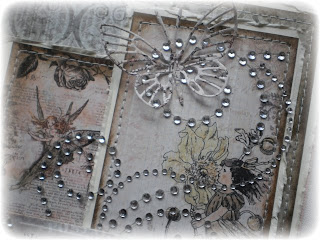
I went with a vintage feel, so I started by distressing and inking the edges of my paper. I also stitched around my papers as well.

I added a butterfly to my design. I used some adhesive pearl flourishes to add some whimsy. I cut pieces and repositioned them to suit my paper.

My sentiment is a rubon that I had. It really compliments the images in the papers.


Supplies:

Paper: Prima Nature Garden, Stampin' Up! Very vanilla

Ink: Walnut stain distress ink

Other: Memory Box kaleidoscope butterfly, JustRite vintage label and banner dies, Francheville vintage button, Kaisercraft basisc rubons, Prima petal pins pearls, Craftworks bling swirls, Hug Snug lyric rose seam binding, Zutter Distrezz it all.

I hope that you'll join us and create a card for the challenge. Take a look at the other designer's blogs for some inspiration. Remember, you have two weeks to complete this sketch challenge and don't forget to link back to Cardabilities.

Thanks for stopping by!


post signature

Sunday, 10 March 2013

Scrapbook Creations no 98

Hello again. This is my second post for the day. I went down the road to get petrol and to grab some lunch. The newsagency was still open so I thought that I'd have a look at the magazines. To my delight, the latest Scrapbook Creations magazine is out and I have a card in this issue. It has been a long time since my card was accepted for publication. My card is on page 140 in the card gallery! This has inspired me to start completing more cards and projects for the magazines submissions.

By the way, got the petrol but forgot to buy lunch. Never mind I have a nice big cup of coffee besides me with the magazine.

Thanks for stopping by!


post signature
Related Posts Plugin for WordPress, Blogger...