Showing posts with label Sizzix. Show all posts

Tuesday, 23 December 2025

Season's Greetings Card


Hello friends. I hope that you are well and having a good week. This is my very last, last minute Christmas card which also uses products from the same paper Collection as my previous card. The Christmas Miracle Kit has so many beautiful images and I wanted to explore using blue tones, which featured in some of the papers.

To help me design my card, I used a card sketch which is something that I often do.


I also created my own poinsettias using distress inks and also watercolour paper. I followed a tutorial by emilia sieradzan to make my flowers and they complimented my card perfectly. I used Spellbinders dies from my stash to frame the Santa image and foam tape to add dimension.


To complete my card, the sentiment was framed with patterned paper and and I added some pearls to
enhance the frame.

Once again, it felt great to be using supplies that were from my stash. Please note that a lot of these products may not be available but you can certainly find similar products and be inspired by my card when creating your own.


Supplies:

Kaisercraft Christmas Miracle Kit Paper Christmas Tree

Kraft cardstock, Anko Watercolour paper 180gsm, Ruby Rock-It Snow White Coarse Glitter, Distress Ink Broken China

Dies: Waffle Flower A7 layers die and additional layers die, Sizzix bigz texture fades layered tattered poinsettia, Magnolia Christmas poinsettia, Memory Box elegant scrollwork, Spellbinders Fleur de Elegance, Hero Arts frame cut oval, Spellbinders bird poinsettia collection.

Thanks for stopping by!


Sunday, 19 November 2023

Have Yourself A Merry Christmas


Hello everyone! I hope that you are well. I cannot believe how quickly the time is passing and Christmas is coming. I have another Christmas card to share with you, featuring some dies. I love cabins and houses, so this was fun for me to make.


It uses some old and new products from my stash. I cut the frame from foam, and adhered my cardstock to the top, to elevate the frame and add extra dimension. I also added some foam to my sentiment, to create added interest to the card.

Supplies:
Cardstock: Kaisercraft CD 324 Crimson, CD 349 Arctic, CD 308 Bark, CD 309 Cinnamon, CD359 Spearmint, CD108 Coffee Bean, CD 301 Snow

Dies: Sizzix Bell Jar Diorama, My Favourite Things Rectangle Frame, Die-namics Fishtail flags

Stamp: Kaisercraft: CS336 First Noel

Ink: Versafine Onyx Black

Spellbinders M-Bossabilities Holiday Magic
Other: Wink of Stella, foam

Thanks for stopping by!


Sunday, 13 March 2016

Friendship


Hello everyone! I have a new card to share with you. I have been colouring today (very relaxing) with my distress markers and also with a Whimsy Stamp. There are a few card challenges that looked interesting and I thought I'd have a go and been inspired by them.

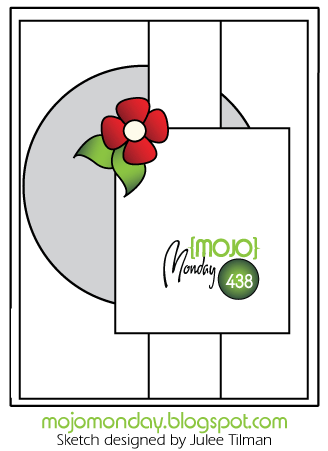
My card follows the latest sketch from Mojo Monday

as well as some design elements from the Tic-Tac-Toe Challenge.
I have used green - friendship-charm in my card.


I am also entering this in the Simon Says Stamp challenge where the challenge is to have a bit of green.

Supplies:

Paper: Maja Design Enjoying Outdoors, Tim Holtz Distress Watercolor Cardstock

Stamp: Wee Stamps Whimsy Stamps Rosetta

Ink: Versafine Onyz Black Ink, Distress Markers, Distress Ink Peeled Paint

Dies: Spellbinders Back to Basics Tags, Sizzix Fancy Rectangle Frame, Prima Doily

Flowers: Green Tara Roses, Wild orchid Crafts, Petaloo Mini Daisy Antique Rose, Prima #577544

Other: Stampmin' Up! Old Olive Satin Ribbon, Hug Snug Seam Binding Chalk White, Hemp, Heart Charm, Wink of Stalla Clear, Krafters Korner Ribbon, Kaisercraft Pearls Pearl.

Thanks for stopping by!


Thursday, 30 May 2013

Happiest Birthday


Hello everyone. Today I am sharing with my final card as a DT with Cardabilities. As always, the sketch created by Karan is amaizng.

For my design, I pulled out a Stampin' Up! stamp set which I love. I stamped the image using StazOn onto Stampin' Up! watercolour paper. I used my Stampin' Up! markers and a blender pen to colour in the image. To age the image to match my patterned paper, I used a blending tool and distress ink to go over the image.

For the other elements, I used a scallop punch to create the scallop edge to the centre panel. I used some die cuts to frame the flowers. I used a fishtail banner die to die cut the sentiment. To create the frame, I simply traced around it. The centre image plus the sentiment are attached with foam tape, to add some dimension.


Supplies:

Paper: Glitz Design Pretty In Pin, Stampin' Up! very vanilla and watercolour paper

Stamp: Stampin' Up! Apothecary Art

Ink: Distress Ink antique linen, StazOn jet black, Memento, Stampin' Up! markers

Other: Fiskars scallop punch, Hooked on Craft flowers, Sizzix little leaves, Memeory Box elegant scrollwork, Die-namics fishtail flags, Stampin' Up! framelits labels collection.

I hope that you'll join us at Cardabilities this week. Be sure to link back your completed cards back to Cardabilities.

I would also like to say thank you to Karan for allowing me to be part of the Cardabilities team. Be sure to see the designs from the new design team, and I'm sure you'll be blown away by their talent and creativity.

Thanks for stopping by!


post signature

Saturday, 13 April 2013

Shabby Flowers

Hello everyone! I am so excited at the moment...school holidays!!! After collapsing with exhaustion yesterday (and also with the aid of a nanna nap) I created this card. It follows the latest challenge from The Shabby Tea Room.

You are asked to create a card or project inspired by the COLORS and THEME of the photo and make it SHABBY!

I started by looking for some shabby/worn looking papers in my stash. I have some papers that looked like weathered wood and yes I found some blue! I imagined a frame to showcase the flowers. I recently bought this Sizzix frame and liked how the centre is cut out when you run the die through your machine. I attached it with some foam tape to the background to add dimension. I then cut some foliage and punched out some branches in a contrasting green (scraps come in handy for this). I added my flowers, starting with the largest and moving to the smallest.

I stamped my sentiment, inked it and again attached it using foam tape. Some pearls finish this element. This card wasn't complicated as I wanted the flowers to be the main focus. I really enjoyed making this card!


Supplies:

Paper: Grant Archival Scrappy Chic, Stampin' Up! crumb cake, whisper white, old olive and bashful blue

Stamp: Stampin' Up! teeny tiny sentiments

Ink: Walnut stain distress ink, Memento tuxedo black

Other: Sizzix Fancy oval frame framelit, Spellbinders foliage and fancy framed tags one. Martha Stewart branch punch, Hooked on Craft flowers, Distrezz It All, Kaisercraft pearls.

Thanks for stopping by!


post signature

Wednesday, 19 December 2012

Christmas Treats

Hello everyone. I am sharing another Christmas card today that I have created. I followed the latest sketch from Mojo Monday which I have rotated.

I also drew inspiration from The Ribbon Reel. You are asked to you create a card / project using the colours
RED
,
WHITE & KRAFT plus BUTTONS, RIBBON & TWINE!

In Australia, our Christmas day is usually quite warm as it is summer. We do however enjoy the tradition of having Christmas stockings, so my card has an Aussie twist!


I wanted to use items from my stash that I haven't used in a while. I selected a Sizzix die that has a bear and a candy cane. After running it through my Big Kick, I had to paper piece all the bits together, a little time consuming but worth it! I also used a brick stencil and used a distress ink to shade it in.
Next I created the other stockings. I carefully peeled off a stocking from a card sent by my aunty and used it as a template (it was store bought card - no harm done!) I used some punches to create the embellishments. Some ribbon and a bow complete my card.


Supplies:

Paper: Kaisercraft Turtle Dove 6 1/2" paper pad, Stampin' Up! very vanilla, whisper white, real red and crumb cake cardstock

Ink: Distress ink old paper

Other: Fiskars retro flower punch and scallop scissors, Sizzix stocking w/teddy bear, Stampin' Up! border punch and real red ribbon, Kaisercraft rhinestones, The Crafters Workshop mini bricks stencil, Spellbinders nestabilities labels eight and decorative labels eight, Becca's peg bow maker, button and twine.

Thanks for stopping by!


post signature

Sunday, 11 November 2012

White Christmas

Hello everyone, I am back again to share another Christmas card. This card follows the challenge from Scrapbook Boutique.
Challenge : Create a project using the photo as your inspiration.
The project can be a card, a scrapbook layout or off the page project......it's totally up to you!
I have wanted to create a completely white card. I created a monotone card a few weeks ago however there was some creme in it to have just a subtle hint of colour.

I used an embossing folder to create the frame. I then cut out a tree using a Memory Box die. I used scraps of white cardstock and a punch to create the layers on the tree. I used glossy accents to attach it all together. The trimmings were simply some white pearls and finally a star , die cut from some glitter cardstock.

Here are some close ups...

Supplies:

Paper: White cardstock, DCWV The Glitter Cardstock Stack

Other: Martha Stewart branch punch, Kaisercraft pearls, Memory Box Twiggy Tree, Sizzix Loving Thoughts set, Spellbinders nestabilities stars five, Stampin' Up! dimensionals, Ranger Glossy Accents.

Thanks for stopping by! 


post signature

Merry and Bright

Hello everyone! Today I am sharing a Christmas card that I have made, following the challenge from JustRite Stampers. For this challenge you are asked to use at least 2 die cut elements on your Holiday project. I love Christmas decorations, and having a chance to get started on making some cards is a real incentive to get moving!

I stamped a tree ornament and layered each section with foam tape. I used a punch to punch out the sentiment as well.
My floral section contains layers of fronds as well as die cut leaves. I applied some glue to the flower petals and added some glitter. I also used some gold beads to create the centre. I love how this is dimensional.


Supplies:

Stamps: JustRite Stampers Merry and Bright

Ink: Stampin' Up! real red

Other: Spellbinders nestabilities 2010 Heirloom Ornament and Layered Poinsettia, Spellbinders shapeabilities foliage, Sizzix ornate frame set, Martha Stewart branch punch, red glitter, Stampin' Up! punch and 2 way glue pen, Glitin Glamour crystalina.

Thanks for stopping by!


post signature

Wednesday, 26 September 2012

Bird Cage Card


Hello everyone! The card I am sharing with you follows the latest challenge from The Shabby Tea Room. This week the theme is 'The White Challenge'. You are asked to create a card or project inspired by the photo USING WHITE PLUS ONLY ONE ADDITIONAL COLOR (you are welcome to include additional neutrals such as cream, kraft, brown, black)!


My card was a labour of love. If it could go wrong it did! However, in the end it was worth it! In my card I managed to use white and cream.

Firstly after seeing the bird cage in the photo inspiration, I could use my Tim Holtz bird cage die. I love this die and don't get to use it very often.  I die cut it using chipboard, applied a layer of gesso then once dry applied two layers of acrylic paint using a makeup sponge. I also went through my beads stash and created some pendants to hang from the bottom of the cage.


Next I started building up my foliage. I used white cardstock to die cut some leaves and a Martha Stewart punch to create some fronds. I used a stylus and shaped the leaves to add some dimension to them as I didn't want then to lay flat on  the card. Using glossy accents, I layered the leaves and fronds at the base of the bird cage.

Using creme cardstock and  another die, I die cut the small flowers. I used my stylus and shaped each one. Time intensive but so worth it! Using tweezers and glossy accents, a glued each into place.

I repeated this for the top, omitting the leaves.


Supplies:

Cardstock - Stampin' Up! Very Vanilla and Whisper White

Other: Tim Holtz Caged Bird, Sizzix Loving Thoughts set, Memory Box Flower Mound, Stampin' Up! sizzlits little leaves, Martha Stewart branch punch, chipboard, Gesso, white acrylic paint.

Thanks for stopping by!

post signature
Related Posts Plugin for WordPress, Blogger...