Showing posts with label felt. Show all posts
Saturday, 21 December 2024
Plush Ornaments
Hello everyone! I hope that the week has been a positive one. Here are the last of my plush felt ornaments. I have a felt deer and gingerbread boy. The gingerbread boy of part of the new Spellbinders Collection. I felt proud of myself when stitching this one as I had to stitch quite a few French knots!
I have had this die in my stash and haven't had a chance to stitch it yet. It was fairly easy. Love the glue!
Here are ALL of my completed plushies. Each year, I plan to add more. I also hope to add some cross stitch pillows in there as well.
Supplies:
Simon Says Stamp Plush Deer, Spellbinders Felt Stitch and Create Gingerbread Boy and Girl.
Thanks for stopping by!
Thursday, 12 December 2024
Felt Ornaments
Hello everyone! I hope that you are well. It has been a little while since my last post, but I will be sharing some stitching and a few Christmas projects that I have been creating these past few days. I am so happy that some stamping companies are releasing some stitching dies, as it has inspired me to bring out my dies from my stash and also purchase some new supplies as I love making felt projects.
I stitched these ornaments using supplies from my stash, and it was great to get the mojo back!
Supplies: Memory Box Plush Gift Ornament, Memory Box Plush Mitten, Memory Box Plush Poinsettia
Other: felt, ribbon, 4mm gold beads, DMC floss.
Thanks for stopping by!
Friday, 21 January 2022
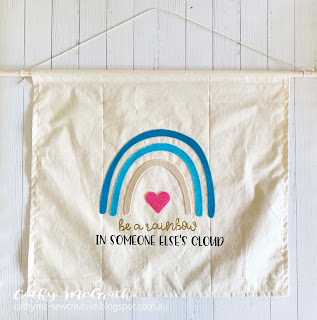
Classroom decor ~ Felt Boho Rainbow Wall Hanging
Hello everyone! I hope that you are having a great week. I have another classroom decor item to share today. I am adding boho rainbow decor item to the room and I wanted to make some impact. This wall hanging will be near the front entrance of my classroom. I used the same cut file from my previous project and used it to cut felt on my Silhouette cameo 3.
I selected some thin felt and applied Heat n Seal on the back using a hot iron. Once this had cooled I transfered this onto a cutting mat. I used Cricut fabric grip mat instead of a Silhouette cuttng mat. I also changed my blade to a deep cut blade as well.
My settings to cut the felt are blade 20 speed 3 force 33 passes 2.
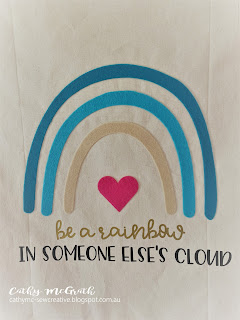
This was the first time that I had cut felt using my Silhouette and it worked. I had thick felt (pink) and it didn't work on my Silhoutte, however I have my die cutting dies, so I used my die cutting machine and a Spellbinders heart die and die cut it out.
For the rest, I used heat transfer vinyl and a cricut heat press and adhered everything onto my fabric.
Can't wait to place this in my room!
Have a great day.
Thursday, 2 July 2020
1000 Hearts Project ~ More Hearts
Hello everyone. I hope that you are safe and well. Finally, I am on school holidays. I have some deadlines to fulfill with school during the break however I am grateful to be able to have time on my side to do so. My school is still working toward reaching the target of 1000 with our hearts so I am making some more.
My first two are a similar take on previous pink hearts that I created. I had left over felt die cuts that I had so I used them to make the floral clusters which you can see.
These hearts are my favourite. I learnt how to create a beaded edge and it was so much fun. I went and bought more beads today and I plan to film a tutorial later in the week. Stay tuned!
Love the contrast with the grey. I had the chance to add some pretty butterflies into these hearts.
As always, stay safe and well.
Sunday, 24 May 2020
Some More Hearts
Hello everyone. I hope that you are safe and well. Today I am sharing some more hearts which I have made for the 1000 hearts project. I was not planning on making any more but as I am 'under the pump' at the moment with remote learning and the constant changes to what is needed at school, I needed something to balance all the crazy. It is amazing, but this week I felt an extreme case of 'teacher tired' all the time.
My first group of hearts featured rainbows. These were inspired by the images from the UK which were to share messages of hope. The above hearts were pinterest inspired...inspired to make me feel happy!
My last two hearts were to challenge my colour selection. Yellow is not a colour I use often and I thought I would use some yellow just to be different in my designs.
It is important to try and look after our well-being. I have to model it for my students yet am I am not very good at executing it myself. These hearts were a great way to have that brain break and keep my mind and hands occupied in a way that was relaxing.
Take good care
My first group of hearts featured rainbows. These were inspired by the images from the UK which were to share messages of hope. The above hearts were pinterest inspired...inspired to make me feel happy!
My last two hearts were to challenge my colour selection. Yellow is not a colour I use often and I thought I would use some yellow just to be different in my designs.
It is important to try and look after our well-being. I have to model it for my students yet am I am not very good at executing it myself. These hearts were a great way to have that brain break and keep my mind and hands occupied in a way that was relaxing.
Take good care
Sunday, 10 May 2020
1000 hearts project for #Santa Strong
Hello everyone! I hope that you are safe and well. As well as a crafter, I am a full time primary school teacher. An initiative my school implemented was the 1000 Hearts.
The explanation shared by the Head of Mission and Identity as to why my school would participate in this initiative is as follows:
This is my next heart....the title given to all co-curricular activities connected to remote learning.
Next I went rustic...I used some more of craft supplies from my stash and pulled out some of Memory Box dies.
I used some of the fabric from my 1000 heart kit in these hearts.
My final hearts....some embroidery and a few embellishments from Memory Box dies.
The explanation shared by the Head of Mission and Identity as to why my school would participate in this initiative is as follows:
"The project is based around small pocket hearts which are handmade by you and stitched with love and good intentions. Over our time in isolation we will make our hearts and when we physically come back together as a community I hope that we will be able to bring back with us at least 1000 hearts. We can then give these hearts
to everyone in our community as well as use some to make a beautiful
wall hanging that will be a constant reminder to our community that when
times were the toughest and most isolated we remained connected and we
cared for each other."
Of course I had to join in!
This post is photo heavy...sorry!
These were my first hearts, using the template supplied with the kit I received.This is my next heart....the title given to all co-curricular activities connected to remote learning.
Next I went rustic...I used some more of craft supplies from my stash and pulled out some of Memory Box dies.
I used some of the fabric from my 1000 heart kit in these hearts.
My final hearts....some embroidery and a few embellishments from Memory Box dies.
The final result.
I really enjoyed making these hearts and learning new skills on the way.
Tuesday, 17 January 2017
Simon Says Stamp Plushies
Hello everyone! It's been terribly hot here in Sydney and I am so thankful for air conditioning! I have been working on something a little bit different and I can say that I am hooked....plushies! I ordered two sets from Simon Says Stamp last year and I have been busy making different owl and sun plushies. I have decided that this year, I will offer this as a co-curricular class for students when I return to school as I know that they will love making them as well.
To create the owls you need two main colours for the body and scraps for the rest. I started using hot glue to attach my pieces but found that a wet glue worked best for me.
I plan to display these owls in my classroom...great home decor pieces.
The Happy Sunshine is the actual plushie that I will make with the students. I suggest that if you plan to make this with children to use a wool needle as it has a blunt point and also a large eye.
Below is a video tutorial on how to create make this plushie. It is a beginner level and it is very back to basics.
Supplies:
wool needle, embroidery floss, felt, cotton balls, Simon Says Stamp Plush Little Owl wafer die, and Happy Sunshine wafer die
Thanks so much for stopping by!
To create the owls you need two main colours for the body and scraps for the rest. I started using hot glue to attach my pieces but found that a wet glue worked best for me.
I plan to display these owls in my classroom...great home decor pieces.
The Happy Sunshine is the actual plushie that I will make with the students. I suggest that if you plan to make this with children to use a wool needle as it has a blunt point and also a large eye.
Below is a video tutorial on how to create make this plushie. It is a beginner level and it is very back to basics.
Supplies:
wool needle, embroidery floss, felt, cotton balls, Simon Says Stamp Plush Little Owl wafer die, and Happy Sunshine wafer die
Thanks so much for stopping by!
Subscribe to:
Posts (Atom)